Although we all love to spoil our cats with special treats, it is important to make sure that the food they are eating is healthy and good for them. Unfortunately, commercial cat treats may contain unhealthy ingredients or additives, which some pet owners would rather avoid.
Therefore, a great way of showing your love for your cat while also providing them with a variety of different foods can be creating homemade cat treats!
”All homemade Cats treats need to be stored in the fridge for no longer than five to seven days to maintain their freshness and prevent spoilage.”Says yourcat.

Not only do you know exactly what’s in there as you will have put it all together yourself, but these 5 recipes don’t even require baking – so convenient!
However, please remember that these should be occasional snacks only and must not replace a complete and balanced diet.
So don’t wait a second longer, it’s time to start making some delicious, nutritious treats for those furry friends of yours! Let’s get started!
Contents
Recipe 1: Tuna Treats
Tuna Treats
Equipment
- 1 Mixing Bowl
- Measuring cups and spoons
- 1 Baking sheet
- 1 Parchment paper
- 1 Air tight container
Ingredients
- 1 Can Tuna (drained)
- 1 Cup Wheat flour
- 1 Egg
Instructions
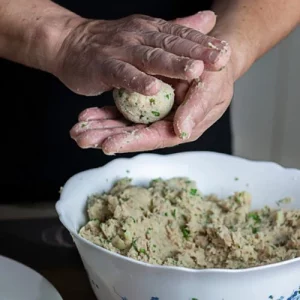
- In a mixing bowl, combine the drained tuna, whole wheat flour, and beaten egg. Mix well until a dough forms.
- Roll the dough into small balls, about the size of a marble.
- Place the balls on a baking sheet lined with parchment paper.
- Freeze the treats for at least 2 hours, or until firm.
- Once frozen, remove the treats from the freezer and store them in an airtight container in the refrigerator for up to a week or in the freezer for a longer shelf life.
- Serve the treats as a special treat for your cat, and always monitor them when they eat.
Notes
Recipe 2: Tuna and egg bites
| Ingredients | Quantity |
| Tuna (drained) | 1 Can |
| Egg (scrambled) | 1 |

Instructions:
- Drain the canned tuna and place it in a mixing bowl.
- Add the scrambled egg to the tuna and mix well.
- Roll the tuna and egg mixture into small balls.
- Place the tuna and egg balls on a baking sheet lined with parchment paper.
- Place the baking sheet in the refrigerator for at least 30 minutes to allow the treats to firm up.
- Once firm, remove the treats from the refrigerator and serve them to your cat as a special treat.
Recipe 3: Fish and cheese balls
| Ingredients | Quantity |
| Drained and Flaked fish (such as salmon or tuna) | 1 Can |
| Grated cheese (cheddar or any cheese of your choice) | 1 Cup |
| Flour (all-purpose or whole wheat) | 1/4 Cup |
| Egg | 1 |
| Breadcrumbs (optional) | 1/4 Cup |

Instructions:
- In a medium-sized mixing bowl, combine the flaked fish, grated cheese, flour, and egg. Mix well until everything is evenly combined.
- Use your hands to form the mixture into small balls, about the size of a marble. If the mixture is too wet to shape, you can add more flour or breadcrumbs.
- If you are using breadcrumbs, roll the balls in them to coat evenly.
- Place the balls on a baking sheet lined with parchment paper.
- Refrigerate for at least 30 minutes or until firm.
- Once chilled, the treats can be stored in an airtight container in the refrigerator for up to a week.
Recipe 4 : Catnip Treat
| Ingredients | Quantity |
| Flour (wheat or rice flour) | 1/2 Cup |
| Catnip | 1/4 Cup |
| Water | 1/4 Cup |

Instructions:
- In a mixing bowl, combine the catnip and flour.
- Slowly add the water to the mixture, stirring constantly until it forms a dough.
- Roll the dough into small balls, about the size of a marble.
- Place the catnip balls on a baking sheet or plate, and let them sit for a few hours to dry out and firm up.
- Once dry, you can store the treats in an airtight container in the refrigerator for up to a week.
Recipe 5: Salmon and Potato Bites
| Ingredients | Quantity |
| Canned salmon, drained and flaked | 1 Can |
| Mashed potatoes | 1 Cup |

Instructions:
- In a mixing bowl, combine the flaked canned salmon and mashed potatoes.
- Mix well until the ingredients are evenly distributed.
- Roll the mixture into small bite-sized balls.
- Place the balls on a baking sheet lined with parchment paper.
- Place the baking sheet in the refrigerator and let the balls chill for at least 1 hour.
- Once chilled, your Salmon and Potato Bites are ready to be served to your cat as a healthy and delicious treat.
Can I use fresh salmon instead of canned salmon in the recipe?
Fresh salmon can be used, but it should be cooked and flaked before being mixed with the mashed potatoes.
Can vegetables be added to the treats?
Yes, you can add small amounts of finely chopped vegetables such as carrots or peas for added nutrition.
Is it safe to use raw potatoes for these treats?
According to Purina ”No, cats shouldn’t eat raw potatoes as they contain a toxic substance called solanine, which is poisonous to cats when digested.” Raw potatoes should not be used in these treats as they contain a compound called solanine that can be toxic to cats. The potatoes should be cooked and mashed before being used in the recipe.
Can cats eat these treats every day?
Treats should be given in moderation, as part of a balanced diet. It is always best to consult with your veterinarian to determine the appropriate amount of treats to give your cat.
Well, It’s a Wrap!
Although we all love to spoil our cats with special treats, it is important to make sure that the food they are eating is healthy and good for them. Unfortunately, commercial cat treats may contain unhealthy ingredients or additives, which some pet owners would rather avoid.
Therefore, a great way of showing your love for your cat while also providing them with a variety of different foods can be creating homemade cat treats!
Not only do you know exactly what’s in there as you will have put it all together yourself, but these 5 recipes don’t even require baking, so convenient! However, please remember that these should be occasional snacks only and must not replace a complete and balanced diet.

Charlene Pare is the founder of Cat Likes Best. She manages and strategizes the content published on this website. When she isn’t working, she enjoys exploring the city around with her Ameican Shorthair kitty–Moli. Being a technocrat and an avid cat lover, she also writes on pet tech products and some of the featured articles.


These no-bake cat treat are like saviour to me as it is healthy, consumes less time to prepare and are very simple.
Great recipes!